Initial Setup (Credentials and Check Point Security Policy Setup)
CloudFormation and Credentials
To get started with this workshop, you’ll first need to gather some information from the CloudFormation stack that was used to build the Workshop Architecture.
-
Login to the AWS Console and navigate to the CloudFormation Console
-
Within the Stacks listing, deselect View Nested and choose the stack you created or the stack beginning with mod-module-1-######
-
Navigate to Stack Outputs and record all the credentials, keys, and values. We will need these later in the workshop
Check Point Security Policy Setup
Now, we need to login to the Check Point Web SmartConsole to setup an initial security policy for the workshop, which will allow us to test all traffic flows.
SECURITY DISCLAIMER – this is a sample policy for this WORKSHOP ONLY and it NOT SUITABLE for a production environment!!!!
-
From the CloudFormation Output, locate the Public IP provided for the Check Point Security Management Server
-
Login to the Check Point SmartConsole application via web console SmartClient:
- Username: admin Password: qwe123!
- Web SmartConsole at https://publicIP/smartconsole
- R81.10 SmartConsole Windows application > Use Public IP from above
-
If you need to install SmartConsole on Windows you can download HERE
-
-
Once logged in, Verify that the CloudGuard Network Security Gateways have been discovered by the Security Management Server
-
Now we, can create an initial Check Point Security Policy. Navigate to the Security Policies tab in SmartConsole
-
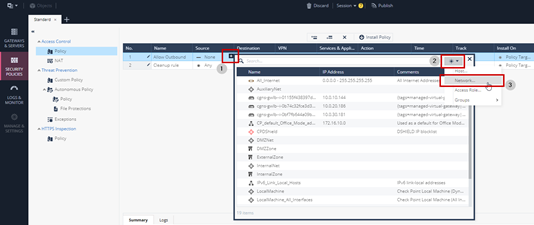
Create a new rule above the default Cleanup rule
- The result should look like this…in this example we gave the rule the name Allow Outbound
-
Modify the new rule to allow the network 10.100.0.0/16 outbound access to ANY
-
Using the same procedure as above, create another rule that allows Inbound traffic to the following networks:
- 10.100.0.0/16
- 10.0.15.0/24
- 10.0.25.0/24
- 10.0.36.0/24
- Set the Cleanup Rule to Log
-
Install Policy to push the new security policy to the Security Gateways


